Implementing an Azure Load Balancer
- Mohd Faizullah

- 2 days ago
- 2 min read
A Complete Hands-On Guide for High Availability and Scalability
📌 Introduction
In today’s cloud-native world, ensuring high availability and seamless scalability is non-negotiable. One of the core services that enables this reliability in Microsoft Azure is the Azure Load Balancer.
In this hands-on lab, we implemented a Standard Azure Load Balancer and configured its essential components, including backend pools, health probes, and load balancing rules, to efficiently distribute traffic across virtual machines.
This blog walks you through the architecture, implementation steps, and best practices—so you can confidently deploy load-balanced applications in Azure.
🧠 What is Azure Load Balancer?
Azure Load Balancer is a Layer 4 (TCP/UDP) load balancing service that distributes incoming traffic across multiple backend resources, such as virtual machines.
✨ Key Benefits
High availability and fault tolerance
Improved application performance
Seamless scalability
Zone-redundant capabilities (Standard SKU)
🏗️ Lab Objectives
During this lab, we achieved the following:
✅ Created a Standard Azure Load Balancer
✅ Configured a Backend Pool
✅ Set up a Health Probe
✅ Defined a Load Balancing Rule
These are the foundational components required for any production-ready load balancing setup.
⚙️ Solution Architecture
Here’s a simplified architecture overview:
Internet Traffic
│
Azure Load Balancer (Frontend IP)
│
Backend Pool (Virtual Machines)
│
Health Probe + Load Balancing Rules
🛠️ Step-by-Step Implementation
1. Create a Standard Load Balancer
Start by deploying a Standard SKU Load Balancer in Azure.
Key configurations:
SKU: Standard
Type: Public or Internal (depending on use case)
Resource Group: Select or create one
Region: Match your backend resources

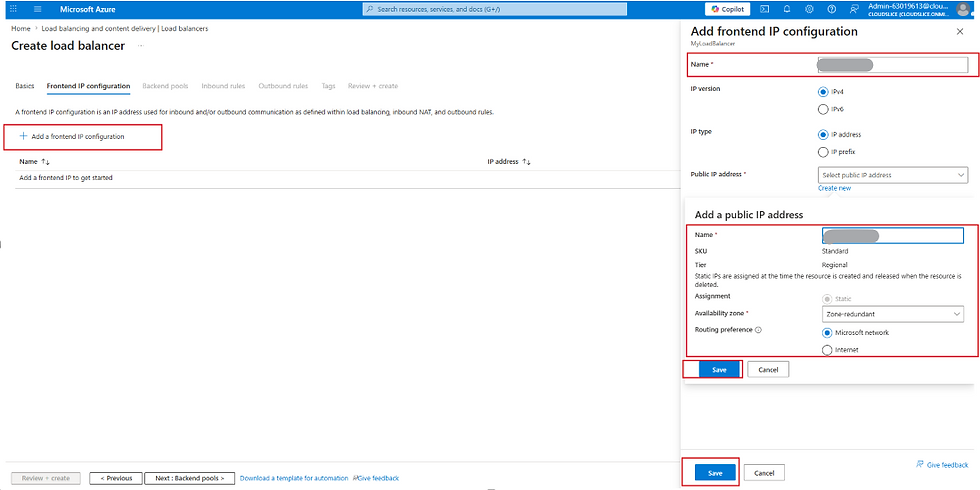
2. Configure the Frontend IP Configuration
The frontend IP acts as the public entry point for incoming traffic.
Options:
Public IP (internet-facing apps)
Private IP (internal services)
3. Create a Backend Pool
The backend pool defines the targets that receive traffic.
Steps:
Add Virtual Machines to the pool
Ensure VMs are in the same virtual network

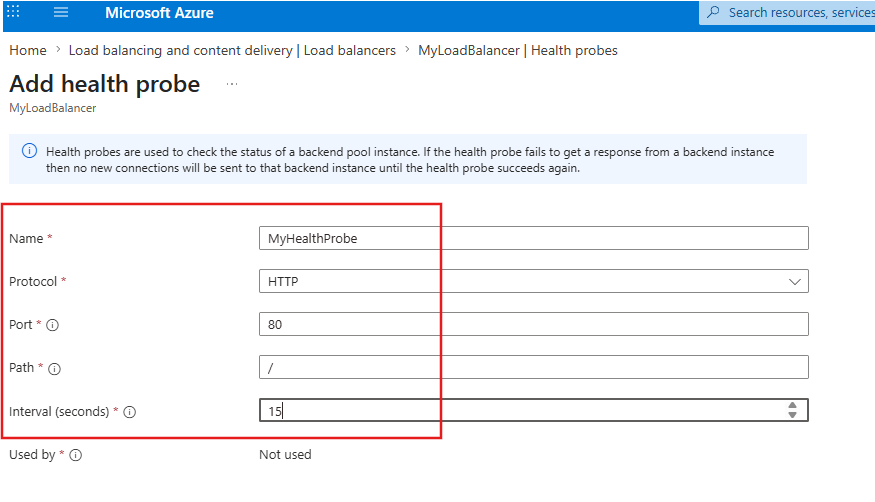
4. Set Up a Health Probe
A health probe continuously checks whether backend instances are responsive.
Example configuration:
Protocol: HTTP / TCP
Port: Application-specific (e.g., 80)
Interval: 5 seconds
Unhealthy threshold: 2
💡 Why it matters:Unhealthy instances are automatically removed from rotation, ensuring uninterrupted service.

5. Create a Load Balancing Rule
This rule defines how traffic is distributed from frontend to backend.
Configuration includes:
Frontend IP and port (e.g., 80)
Backend pool
Health probe
Backend port
Session persistence (optional)

✅ Validation and Testing
Once configured:
Access the frontend IP address
Send multiple requests
Verify responses are served by different backend VMs
Tip: Add distinct identifiers (e.g., hostname) on each VM to easily confirm traffic distribution.
📊 Real-World Use Cases
Hosting highly available web applications
Scaling microservices across multiple instances
Backend traffic distribution for APIs
Disaster recovery and failover setups
🎯 Conclusion
Implementing an Azure Load Balancer is a foundational skill for any cloud engineer. In this lab, we successfully deployed and configured a Standard Load Balancer with all required components—creating a resilient and scalable infrastructure.


Comments